So with Easter only a few weeks away I have been looking at some simple Easter crafts you can enjoy with your little ones to help pass the time.
Salt Dough Easter Eggs
You can get the children involved with not only the making of the salt dough but also the painting and hanging. These can be indoors for an Easter Tree if you have one. Alternatively, you can give them as gifts.
Recipe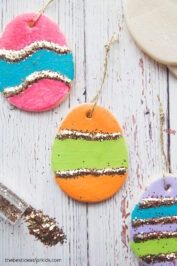
Super easy this one as it is only three ingredients, water, salt and flour: 4 cups of plain flour, 1.5 cups of warm water and 1 cup of salt. Simply combine all the ingredients until it forms a dough. Then knead for 10 minutes making sure is it not too lumpy or dry (if so, add more water) and hey presto you are ready.
Roll the dough out to around 5-10 mm deep. You don’t want to it too thick as they will take longer to dry. Use a cookie cutter if you have an egg shaped one or if not, just cut round an egg-shaped card template. If you wish to hang them, pop a hole into the top at this stage and leave to air dry for 24 hours before baking. This should stop any puffing when baked.
Bake for 1-2 hours at 120 degrees Celsius (or 250 Fahrenheit). Low and slow is what you want here. Keep an eye on them and once they’re dry on the top, flip over and bake on the other side.
Once cooked and cooled you are ready to paint and decorate with anything you can find. Although acrylic paints do work best. Once dry you can add glitter or any other decoration you wish to glue on. Then hang with string or decorative ribbon.
If you want to keep the decorations you will need to glaze with either Modge Podge or a clear spray seal. Both of which you can find on Amazon.
A full list of instructions can be found here at The Best Ideas For Kids
Egg Decorating
I remember to this day making these as a child. Super fun, super simple Easter crafts that any age can be involved in.
Instructions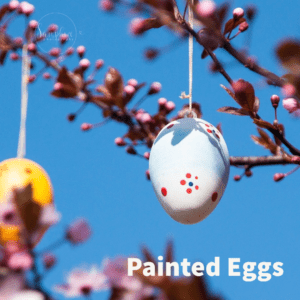
First blow you egg. Wikihow give good instructions here. But it is really simple. Clean the outside of the egg first. Then tape the top and bottom of the egg to prevent cracking. Stick a pin or needle in each end and wiggle till you have a small hole at one end, around 30 mm, and a larger hole at the other end, around 80 mm.
You then need to insert a thin piece of metal such as a skewer, carefully insert into the egg and wiggle around to break down the yolk. Otherwise you will find blowing them really hard!
Then blow into the small hole and the egg should come out the other end. So have a bowl ready to collect it and use for your scrambled eggs later! I remember my cheeks aching at this point when I was young but I may have omitted the breaking up of the yolk part when I did it!
Once your egg is rinsed and left to dry overnight you are ready to paint or decorate.
Again, you can use whatever you wish or have to hand; acrylic paints, watercolours, pens, glitter, stickers etc.
Or if you are looking to make something a little more chic check out The Herbal Academy for some beautiful ideas and techniques
You can then use them to hide in the garden in lieu of chocolate, decorate your table, or hang on an Easter tree or around your garden. Childhood memories being made right here.
Easter Baskets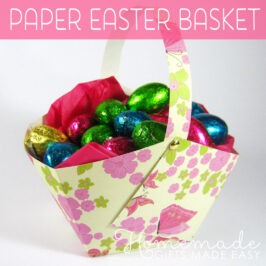
How about making some Easter baskets to put all your painted and salt dough eggs in? These can be made with any colour paper and are super easy. Tip Junkie has a whole list of different baskets you can make, and a good old paper bag is all you will need for many.
This is one of my favourites though from Homemade Gifts Made Easy. All you need is some thick paper cut into a square, plus a thin strip for a handle, pencil, ruler, scissors, stapler and glue or double sided tape. Once made if you don’t have any decorative paper to start you can again have the children decorate with anything you have to hand. It looks super sturdy and will also be great for storing any eggs found on an Easter egg hunt.
If you want to have your children make them on the run up to Easter you can even have them hang them in the garden the night before to see if the Easter bunny happens to be passing.
Get Baking
 I love having fun in the kitchen with my little ones and as soon as they could stand I had them involved in some kind of baking. Often the licking of the bowl proved a bigger draw but it was always fun. Whether making cupcakes or something a little bigger it’s super simple to add on some eggs or rice paper decorations to turn it into a Easter themed bake.
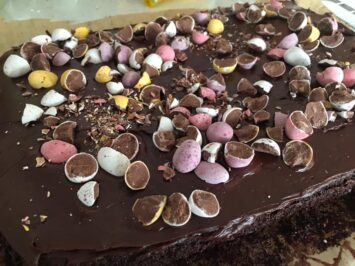
Last year my daughter made this Easter chocolate Fudge Cake by Waitrose. It was simply yummy. So much so – and mini eggs being a particular favourite of mine – that I might get her to bake another one this year. My mouth is watering just looking at it!
All Things Bunny
 It wouldn’t be Easter without the Easter Bunny right? There are loads of amazing but simple Easter crafts out there that involve our little furry friends. Why not try making cute bunny origami bookmarks? My children love making these and they are super easy and a great gift for Grandparents too. I have just found this online tutorial which shows how simple it is.
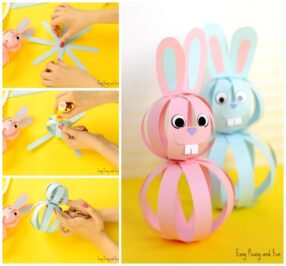
Or why not try this 3-d paper bunny from Easy Peasy and Fun . You just need, paper cut into 4 long strips and 4 strips, scissors, google eyes (or pen and paper if you don’t have any to hand), glue.
Take 2 long strips and glue them into a cross shape. Repeat. Then stick these 2 crosses together offset to make a flower/snowflake shape. Do the same with the smaller strips.
Take the large flower and bend 2 opposite strips up till they touch and glue together. Repeat with all strips until you make a ball shape. Repeat with the smaller flower shape and glue together.
Cut out some ears, nose and eyes if you don’t have any googly ones and stick onto the smaller ball and… hello bunny!
So why not get creating and have a fab Easter everyone.
Simple Easter Crafts by Samphire Photography



Comments are closed.